
Page creation
If you cannot find what you are interested in below, feel free to use the official Mahara English manual linked above or contact your teacher.
The hamburger menu in the top-right corner includes 4 basic groups of tabs:
- Dashboard = your profile page that shows when the reader clicks your user name
- Create = all items you have saved on Mahara, such as pages and files, including photographs
- Share = your pages and collections
- Engage – engagement in the Mahara community including groupszapojení do komunity Mahara včetně Skupin; for more information on groups, see the section below
- Manage – export a import (html)
It is best to create a new page following the chain hamburger menu in the top right corner > Create > Pages and collections > +Add.
If you create a new page using Pages and collections on a Group page, all members of the group can usually edit and delete that page, so consider whether you want to allow that. A page created through your portfolio is your own and no-one else can make changes there (you only share, so allow other to see it).
You will first need to chose between a Page and a Collection. A collection is a group of pages.
One field that needs to be filled in is the Page title. If you don't change it, it will ba saved under the name "Untitled", which is not very descriptive. The name can also be changed later, by using the icon Settings in the editation menu.
You don't need to include anything in the Page description. If you include anything (for example a short description of what the reader can find on that page), this description appears in page lists just under its title.
Important: Always save the changes you have made by clicking the button Display page at the bottom so as not to lose any data.
After saving the changes you are moved to the tab Edit content, which enables you to put in contents of the page. However, you may also decide to change the layout, i. e. the number and position of sections and columns on the tab Edit layout. You can also change the layout at any time.
Click the Drag to add a new block button (+) onto the page to place a block.
Click the Settings (cogwheel) button to add and modify page settings like title and description and skin.
Click the Display page (screen) button to review your page to see how others, who have access to it, will see it. When you are in edit mode, this button is highlighted.
Click the Share button to decide who shall have access to your page (or collection if the page is part of one).
You can change a previously saved page by clicking the Edit page button (pencil) in the top-right corner. For further steps, read on below.
You can delete a whole block by clicking the icon Remove block.
If you want to include some text, drag & drop the Plus icon (+) from the right. That opens a window with a new block that makes you choose where this block will be situated on your page, so you select the top or bottom position.
Change the title "Placeholder" to a descriptive title of your block. Block content includes the contents to read. You can edit it using the icons you will know from Word, for example, such as italics/bold, bulleted lists, including a picture and/or a link, etc. You can find a detailed description below.
Selecting Retractable enables the reader to hide the contents of the block.
Selecting Automatically retract will hide the contents upon opening the page and the reader will have to click it open.
Save the block (Save).
You can delete a whole block by clicking the icon Remove block.
Before selecting the type of edit, use your mouse to select the part of text you are planning to change, or place your cursor on the selected text.
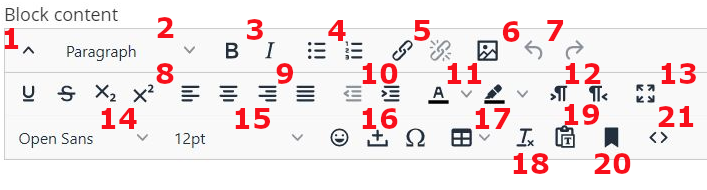
- Shows/hides the 2nd and 3rd row of buttons (8–21)
- Type of text block: paragraph, heading, etc.
- B = bold, I = italics
- Bulleted / Numbered list
- Inserts / Deletes a hyperlink
- Inserts/changes an image
- Undo / Redo (usable only after an edit has been done)
- U = underline, S – strike though, x2 – subscript, x2 – superscript
- Align the text left or right, center or block
- Decrease / Increase indent
- Font color, highlight color
- Changes the direction of the text (left-to-right, right-to-left)
- Fullscreen mode
- Font family (e.g. Arial, Times New Roman etc.)
- Font size (e.g. 12 or 24 points)
- Inserts an emoticon / Nonbreakable space / Special symbol
- Inserts a table
- Clears formatting
- Pastes as text
- Insert an anchor
- Shows/hides source code
Inserting an image from the Internet
Most users just have 50MB space, so it might be more convenient to insert images using hyperlinks instead of uploading them to Mahara. You can find out how much space you have left at Quota using Create => Pages and collections => Files.
Inserting a picture
- Select editing the text block where you are planning to insert the picture by clicking the cogwheel in the top-right corner of the block.
- Put the cursor at the place where you would like to have the picture.
- Click the image icon (Insert/Edit image).
- In the new window, paste the image url (Insert or edit an image) – you get it by clicking the right mouse button and selecting Copy image address.
- In Image formatting options you can set some more technical details, such as the image size (Dimensions – 300 x 200, 100 x 100 etc.), increasing indent from the text horizontally or vertically, setting the border (Border width, e.g. 2), or alignment (left, top etc.)
- Save (Submit/Cancel).
Uploading your own image
If you wish to insert your own image, use the tab Image from the left menu. In the window that opens, select one of the grey cells depending on where you want to place the picture. Save.
Block title in the next window shows the name of the block. Image is the picture that will be placed on the page. You can choose a particular picture to upload from your computer using Browse. Below you can find also a list of pictures which you have already uploaded to Mahara, and of course you can also choose one of those.
Clicking the pencil icon on the right enables you to edit the picture. You can change its Name, but careful – do not delete the dot and extension (e.g. .jpg/.png). It is a good idea to have all files named specifically instead of keeping the camera names, which usually just include numbers given to the image by the device. If you fill in the Description, you can see it under the picture. You can also add Tags, separated from each other with commas. By ticking Allow comments you allow the readers to write their questions, opinions and other notes.
The width of the picture is in pixels. If you do not specify, the picture will appear in such a size to fit the block well. Ticking Retractable allows the reader to retract the picture. If you choose Automatically retract, the picture is hidden by default and the reader needs to click the block open to be able to see the image.
Remember to Save your changes.
You can also decide to Remove (delete) the picture.
- Find the video you would like to use, making sure it is one of the formats accepted by Mahara, such as YouTube (you can see a list of all accepted formats in the block).
- Get the video url or embed code from the Internet including the <iframe> tags (on YouTube: Share > Embed < >).
- A video can be uploaded using the block External media (click "+" in the top right corner and then Show more several times to find it) => paste the image url. The video is not uploaded in Mahara physically, which saves your Mahara space.
A quick alternative used on this page: select the block Text > switch to editing the source code (roll-down menu on the left, click < >) > paste the embed code. - Give the block a name, e.g. "Video".
- Save.
- Drag the block to the place where it looks good. Make sure the video is not cropped on the sides (if it is, drag the right side wider).
You can insert this license into your pages, using the (+) option on the right => expand Show more several times > select the Creative Commons license block, which you then drag with the mouse to the place where you want it. The versions differ minimally from each other (e.g. CCA-SA 3.0 or 4.0).
CCA-SA License – detailed information
For published text and photos, it is always a good idea to include a license that clearly describes what can be done with the published image or text. In short, the Creative Commons Attribution-Share Alike option means that whoever uses the work (e.g. image/text) can further modify it, publish it commercially, but must do so under the same free licence (so others will know they can do likewise), and is also obliged to include the name of the author.
You can find more information about the free licenses under which it is published on Wikipedia, for example, here: https://creativecommons.org/, about particular CC-BY-SA licences on the links here:
When you create a new page, you are the only one who can see it.
If you do not share the page with other users or groups of users, no one else will see the page. This allows you to prepare the page for later publication, but then remember to share it, for example if it is a presentation or CV page that needs to be accessed by others.
- While in the editation mode, select the padlock button in the right menu.
- Use the dropdowns next to the Shared with button to select those you want to be able to read your page, for example a group or specific users.
- Save the selection with Save below.
You can also make changes in page sharing via the padlock button in the list of pages (hamburger menu => Create => Pages and collections).
- Add comment – write your comment/feedback/question
You can hide the page from the readers by not sharing it with anyone (see the Visibility link above).
You can delete a page via Create => Pages and collection and selecting Delete on the three dots in the box of the page you want to delete.
Careful, deleting a page is permanent and cannot be undone.
The links below lead to external websites using Mahara.